
- Conflict:
- First World War (1914-18)
- Service:
- Army
The Anzac force at Gallipoli in April 1915 did not originally include Australian Light Horse; mounted troops could not operate in Gallipoli’s rugged terrain. Heavy losses, however, soon saw light horsemen embarked to the peninsula where they fought dismounted alongside Australian infantry. Thirteen regiments eventually served there.
For the Light Horse, the two most notable events of that campaign of attrition were the debacle at the Nek that devastated the 8th and 10th Regiments on the morning of 7 August, and the Victoria Cross awarded later the same month, to Lieutenant Hugo Throssell of the 10th Light Horse Regiment, at Hill 60.
After the evacuation of Anzac Cove in December 1915, those Australians well enough were returned to Egypt. Here they renewed their training, were rested and reinforced. By the middle of 1916 virtually all troops, bar the Light Horse, had been sent to the Western Front in two Anzac Corps, formed from the expanded Australian Imperial Force (AIF) and the New Zealand Division.
Each of the Anzac Corps on the Western Front was allocated a regiment of mounted troops. The I ANZAC was allocated the 13th Light Horse Regiment while II ANZAC received two squadrons of the 4th Regiment and a squadron of New Zealand’s Otago Mounted Rifles. Nominally at least, each corps’ three divisions had a squadron of horsemen at its disposal. Regrettably, these Western Front light horsemen have been largely forgotten despite sharing the vicissitudes of their countrymen in the horrific conditions of France and Belgium.
By mid-1916, Australia’s volunteer army was spread across two separate theatres. The infantry divisions and their attached units were on the Western Front. The bulk of the Australian Light Horse, however, remained in Egypt, where, under the leadership of Major General (Maj Gen) Harry Chauvel, they soon won a series of splendid victories against the Ottomans in the Sinai—pushing them east from the Suez Canal back towards Palestine.
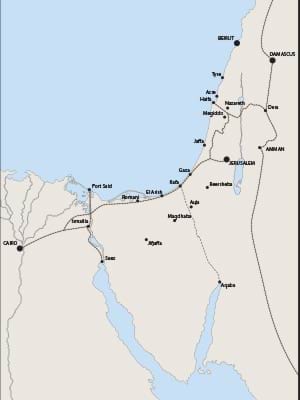
At Romani, in early August 1916, Chauvel inspired his troops riding back and forth, under enemy gunfire, between his brigades. Success followed at the ‘squalid huddle of mud huts’, known as El Arish on 21 December, against the redoubts of Magdhaba on 23 December and, following a long march, at Rafa in early January 1917.
Further north, along the coast, was Gaza—lynchpin of the Ottoman defence. Two British infantry assaults there, one in March 1917 and another in April, failed. The first, arguably through incompetence at (British) high command level. The second, because the enemy were afforded time to substantially improve and reinforce their defences.
Failure prompted change. Lieutenant General (Lt Gen) Sir Archibald Murray, Commander-in-Chief of the so-called Eastern Force was replaced in June 1917 by Lt Gen Sir Edmund Allenby, nicknamed ‘the Bull’ for his abrupt temper. Chauvel, meanwhile, was promoted Lt Gen and placed in command of the Desert Mounted Corps. The corps comprised the Australian and New Zealand Mounted Division (Maj Gen Sir Edward Chaytor), the Australian Mounted Division (Maj Gen Sir Henry Hodgson) and The Yeomanry Mounted Division (Maj Gen Sir George de Symons Barrow).
Allenby determined that once sufficient men and materials were available he would attack—not Gaza—but Beersheba, some 45 kilometres inland. His battle-plan was based on one devised sometime earlier by another former Eastern Force commander, Lt Gen Sir Phillip Chetwode. After much reconnaissance, particularly involving the search for water, the attack was planned for the last day of October 1917.
In accordance with the plan, and following lengthy approach marches, the town of Beersheba was surrounded—roughly speaking with British infantry to the west, British yeomanry to the south, Australian Light Horse to the north-east and south-east and New Zealand Mounted Rifles to the east around the high ground at Tel el Saba. The Kiwis encountered the most resistance during their advance but took the Tel by 3pm, with aid from the 1st Light Horse Brigade.
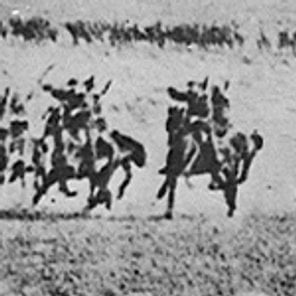
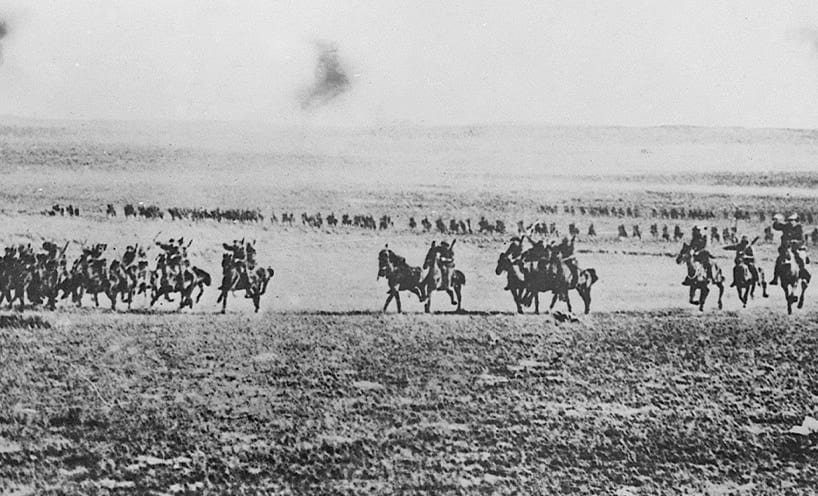
Uppermost in Chauvel’s mind was an acute lack of water for man and more significantly, perhaps, horse. Beersheba’s wells had to be taken and Chauvel called senior officers to his headquarters south-east of the town—famously advising Hodgson to ‘put Grant straight at it’. The 4th Light Horse Brigade, under Brigadier-General William Grant, was thus the one to charge Beersheba’s defences from the south-east—a decision informed largely by the fact that Grant’s men had thus far seen little action.
Significantly, it was also known from aerial photographs that the defences in that sector were incomplete and without barbed wire. With only the 4th and 12th regiments at his disposal, Grant rode forward at about 4.30pm as the light began to fade—the 12th on the left of the advance and the 4th on the right. A walk became a trot, a canter, and at last, a gallop. Expecting the horsemen to stop and dismount, as was their usual mode of attack, the enemy was nonplussed when they did not. Instead the men charged on, rifles slung and bayonets in hand.
Turkish fire discipline evaporated. Rifle and machine gun fire became erratic and mainly flew over the heads of the horsemen, although some horses were hit near trenches when the men in the first squadrons dismounted and took to the Turks with their bayonets. The success of the encounter might best be gauged by the fact that there were only 31 light horsemen killed and 36 wounded, most of those falling not in the charge but in the trenches.
By nightfall the town was taken. Many Turks were prisoners and those not captured were fleeing north. If not necessarily the battle that entirely opened Palestine to the British cause—the Turks were already suffering a sense of impending doom that had begun earlier in the Sinai—it nonetheless showed the potential for determined mounted attacks even against fortifications and especially if assisted by air reconnaissance and artillery support.
Turkish resistance may have weakened but it had by no means disappeared. Determined Ottoman rear-guards at Tel el Sheria and Tel el Khuweilfe, troop fatigue and the ever-continuing search for water, hindered Allenby’s plans. Nevertheless, Jaffa fell to the mounted New Zealanders in mid-November and Jerusalem was in British hands by Christmas 1917. Both were a fillip to flagging British Empire spirits—low after a year of unrestricted submarine warfare, Western Front debacles at Arras and ypres and the loss of an important ally in the fallout of the Russian Revolution.
Despite arguments that light horsemen should now be armed with swords, since they had effectively demonstrated with bayonets the effectiveness of a cavalry charge, there was no immediate change in weaponry. The impetus of the advance northward had slowed and the mounted troops were withdrawn to positions along major railway lines in an attempt to ease supply difficulties.
Author
Dr David Holloway OAM is a retired secondary school teacher and a former sergeant of the 4th/19th Prince of Wales’s Light Horse Regiment. He remembers fondly monthly dinners with the grand old men of the Light Horse and has written two books on the subject: Hooves, Wheels and Tracks andEndure & Fight. Dr Holloway is the current patron of the 4th Light Horse Regiment Memorial Association. He was awarded the Shrine of Remembrance Medal in 2011 and the Medal of the Order of Australia in 2017 for services to military history.
Updated